

Hello again, in this blog I’m going to walk you through a Windows 10 deployment using Microsoft Deployment Toolkit (MDT) referencing this TechNet Link, I used the below in my lab :-
- DC1: Server running Windows Server 2016 acting as a domain controller and a DHCP server.
- SCCM1: this is actually my SCCM server, running Windows Server 2016, I also installed the WDS role, Windows Assessment & Deployment Toolkit & MDT of course v8450 , (SCCM will not be part of this blog)
- Hyper-V is used as the virtualization platform in this lab.
To follow the same steps of the article, please note that this blog will be divided into sections as follows :-
- Install MDT.
- Create a deployment share and reference image.
- Deploy a Windows 10 image using MDT.
Refreshing and Replacing Windows 10 will be covered in other blogs.
So, let’s start.
1.Install MDT
Installing MDT is a straight forward process, I followed the wizard till the end like below after downloading it from here


2.Create a deployment share and reference image
First we need to mount the Windows 10 Enterprise DVD into the server, which I did like below, I mounted the .iso file into the VM from the VM settings.
Below screenshot is showing it is Windows 10 pro, I replaced it with Enterprise but you got the idea 🙂

From the Start Menu, type “Deployment Workbench”, click it so that the management console opens

![2018-02-02 08_59_31-DeploymentWorkbench - [Deployment Workbench]](https://tarekeltouny.files.wordpress.com/2018/02/2018-02-02-08_59_31-deploymentworkbench-deployment-workbench.jpg?w=720)
From “Deployment Shares” section we will create our first shared place for our reference image, so, click on “New Deployment Share”
![2018-02-02 09_00_13-DeploymentWorkbench - [Deployment Workbench_Deployment Shares]](https://tarekeltouny.files.wordpress.com/2018/02/2018-02-02-09_00_13-deploymentworkbench-deployment-workbench_deployment-shares.jpg?w=720)
We will follow the wizard exactly as the TechNet article guides us, we will define the deployment share path, name, description and the deployment wizard behavior, after that we will be able to see the new deployment share folder in the deployment workbench as below


Now we are going to add the operating system from the “Operating Systems” subfolder, we will call it “Windows 10” as below: –


Now let’s import the OS, click on “import Operating System” and follow the wizard, we are going to use the DVD we mounted before as our source, continue till the OS appears under the operating systems folder (the wizard will copy the necessary files to the deployment share we created earlier)


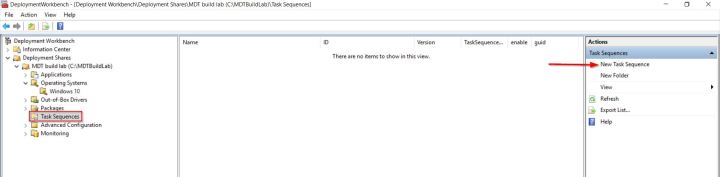
Now is the part of the task sequence we are going to associate with the OS, we will click “New Task Sequence” and define the following: –
- Task Sequence ID, name and comments.
- The starting point template.
- The OS we want to associate the task sequence with.
- The product key.
- OS settings like organization name and IE homepage.
- Admin Password.
Below are all the variables for the reference image task sequence, after finishing the wizard the task sequence will appear under the task sequence folder


Now double click on the task sequence we just created, click on “Tattoo”, from the “add” tab, click on “new group”

We will add additional step, what is it? we will add .NET Framework 3.5 to the image since many apps require it, this is an example of how to you can alter the task sequence and add the roles and features you like
So, after adding the group give it a name like (Custom Tasks (Pre-Windows Update)), click somewhere else for the name to appear

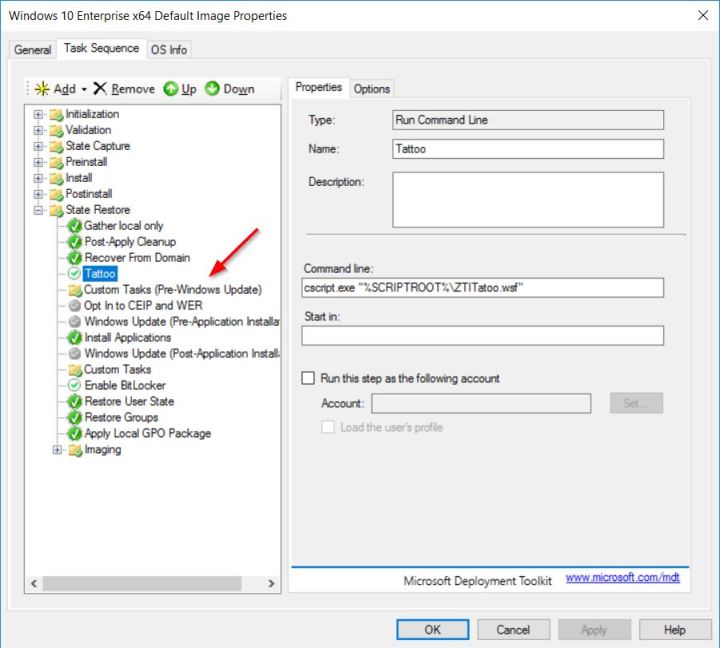
Now add .NET Framework 3.5 like below


Press apply when done, by default you will see that Windows Update is disabled, we can uncheck the below checkbox to allow the updates, press ok when done

We will visit the properties now for our deployment share to add the rules the image will follow, please copy the below rules and paste them as below
[Settings]
Priority=Default[Default]
_SMSTSORGNAME=Contoso
UserDataLocation=NONE
DoCapture=YES
OSInstall=Y
AdminPassword=pass@word1
TimeZoneName=Pacific Standard Time
OSDComputername=#Left(“PC-%SerialNumber%”,7)#
JoinWorkgroup=WORKGROUP
HideShell=YES
FinishAction=SHUTDOWN
DoNotCreateExtraPartition=YES
ApplyGPOPack=NO
SkipAdminPassword=YES
SkipProductKey=YES
SkipComputerName=YES
SkipDomainMembership=YES
SkipUserData=YES
SkipLocaleSelection=YES
SkipTaskSequence=NO
SkipTimeZone=YES
SkipApplications=YES
SkipBitLocker=YES
SkipSummary=YES
SkipRoles=YES
SkipCapture=NO
SkipFinalSummary=NO
Important: please alter the variables the way you see fit your organization and lab
This is where I paste the rules

And for the Bootstrap.ini, you will paste the following (Please alter the account who has the right to access the deployment share and grab our image)
[Settings]
Priority=Default[Default]
DeployRoot=\\SRV1\MDTBuildLab$
UserDomain=CONTOSO
UserID=MDT_BA
UserPassword=pass@word1
SkipBDDWelcome=YES
This is my rules for the Bootstrap.ini

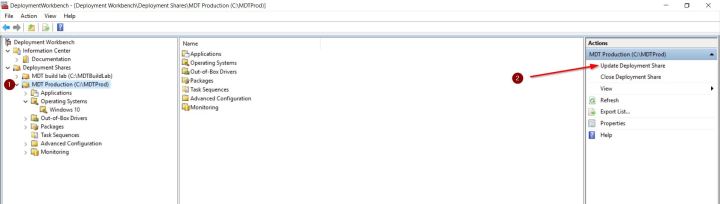
OK! great!, press ok when done on all wizards to exit editing the rules, let’s now update our deployment share to tell it that we have finished editing the reference image for it to generate the .iso file for us, so, from the main folder we will click on “Update Deployment Share” and follow the wizard.


OK now let’s use the image below to create and capture our VM (LiteTouchPE_x86.iso)

Copy c:\MDTBuildLab\Boot\LiteTouchPE_x86.iso on SRV1 (or your MDT server) to the c:\VHD directory on the Hyper-V host computer.
Note that in MDT, the x86 boot image can deploy both x86 and x64 operating systems, except on computers based on Unified Extensible Firmware Interface (UEFI).
Now on the Hyper-V host itself, you can run the below script to create a new VM from our .iso file and connect to it like below
New-VM REFW10X64-001 -SwitchName poc-internal -NewVHDPath “c:\VHD\REFW10X64-001.vhdx” -NewVHDSizeBytes 60GB
Set-VMMemory REFW10X64-001 -DynamicMemoryEnabled $true -MinimumBytes 1024MB -MaximumBytes 1024MB -Buffer 20
Set-VMDvdDrive REFW10X64-001 -Path c:\VHD\LiteTouchPE_x86.iso
Start-VM REFW10X64-001
vmconnect localhost REFW10X64-001
Please make sure you alter the -SwitchName parameter to fit your environment (this should be the Switch connected to the MDT Server) and alter other specs. as well if you need, for me, I ran the script like below and got my VM created and turned off, what this setup will actually do is : –
- Install the Windows 10 Enterprise operating system.
- Install added applications, roles, and features.
- Update the operating system using Windows Update (or WSUS if optionally specified).
- Stage Windows PE on the local disk.
- Run System Preparation (Sysprep) and reboot into Windows PE.
- Capture the installation to a Windows Imaging (WIM) file.
- Turn off the virtual machine


OK when I revisited my MDT server I found out that the previous procedure has captured the image to the directory below

3.Deploy a Windows 10 image using MDT
We will use the .wim file captured in the previous step for our production imaging deployment, So, again we will create a new deployment share like the one we did before with the following variables


Then we will create a folder under the “Operating Systems” to import the OS to it based on our captured image this time like below, through the wizard, we will point to the directory of Windows 10 source folder which was copied before to the MDTBuildLab deployment share, please follow the steps below : –


I gave my image a friendly name by changing it to “Windows 10 Enterprise x64 Custom Image”, just double click on the newly created image and change the first field then press OK!


Also like before, we will create the below task sequence for our new custom image like below: –


Also like before, we will edit the CustomSettings.ini & Bootstrap.ini files in the MDT Production deployment Rules tab, to follow the article we need to copy those files from the templates directory in MDT by running the below script: –
copy-item “C:\Program Files\Microsoft Deployment Toolkit\Templates\Bootstrap.ini” C:\MDTProd\Control\Bootstrap.ini -Force
copy-item “C:\Program Files\Microsoft Deployment Toolkit\Templates\CustomSettings.ini” C:\MDTProd\Control\CustomSettings.ini -Force

This we will edit the Rules by running the below script, don’t forget to alter the rules to fit your environment
[Settings]
Priority=Default[Default]
_SMSTSORGNAME=Contoso
OSInstall=YES
UserDataLocation=AUTO
TimeZoneName=Pacific Standard Time
OSDComputername=#Left(“PC-%SerialNumber%”,7)#
AdminPassword=pass@word1
JoinDomain=contoso.com
DomainAdmin=administrator
DomainAdminDomain=CONTOSO
DomainAdminPassword=pass@word1
ScanStateArgs=/ue:*\* /ui:CONTOSO\*
USMTMigFiles001=MigApp.xml
USMTMigFiles002=MigUser.xml
HideShell=YES
ApplyGPOPack=NO
SkipAppsOnUpgrade=NO
SkipAdminPassword=YES
SkipProductKey=YES
SkipComputerName=YES
SkipDomainMembership=YES
SkipUserData=YES
SkipLocaleSelection=YES
SkipTaskSequence=NO
SkipTimeZone=YES
SkipApplications=NO
SkipBitLocker=YES
SkipSummary=YES
SkipCapture=YES
SkipFinalSummary=NO
EventService=http://SRV1:9800
Notice how we are going to join our new machine to the domain, notice also that you need to specify the domain admin password in this step and other information, make sure you edit this accurately to save you from troubleshooting errors afterwards

I edited the Bootstrap.ini like I did before, by the way, I edited this section wrongly and it caused me a big headache to troubleshoot and figure out why PXE is not able to connect to my MDT server, I then discovered I typed CMAdmiin instead of CMAdmin 🙂 please be careful and accurate

Press OK on all wizards to exit rules editing.
The only step remaining is …. yes you guessed it, let’s update the deployment share as we need it to give us our new custom boot image


Now let’s start our WDS server services by running the below script
WDSUTIL /Verbose /Progress /Initialize-Server /Server:SRV1 /RemInst:”C:\RemoteInstall”
WDSUTIL /Set-Server /AnswerClients:All


We will open the Windows Deployment Services and add our custom boot image to the boot images folder for deployment


I have an external network adapter which I also disabled before the deployment

The cool thing is that we can monitor the deployment process from the deployment workbench by turning on the monitoring for the deployment share like below


We can make sure that monitoring service is functional by visiting this link http://localhost:9800/MDTMonitorEvent/

We can also quickly configure our DHCP scope options, below are the options I created, make sure you configured your DHCP correctly, and in case your WDS server is the same as DHCP, make sure you check both checkboxes under the WDS server properties–>DHCP tab

OK, in my Hyper-V host, I ran the below script to create a new generation 1 VM with the specs mentioned in the script, again, make sure you accurately alter the parameters to fit your environment
New-VM –Name “PC2” –NewVHDPath “c:\vhd\pc2.vhdx” -NewVHDSizeBytes 60GB -SwitchName poc-internal -BootDevice NetworkAdapter -Generation 1
Set-VMMemory -VMName “PC2” -DynamicMemoryEnabled $true -MinimumBytes 720MB -MaximumBytes 2048MB -Buffer 20
I then connected to the VM, pressed F12 multiple times till I was able to connect to the WDS server and download the boot image, the OS installation was successful, I logged in as the domain admin as a proof that the machine was successfully joined to the domain, I checked also the system information and the TCP/IP configurations and all seemed fine.


Notice how we can monitor the process in the monitoring section in the deployment workbench under the our deployment share, we also have the options to make a remote desktop or a VM connection


OK! great! now we have a Windows 10 PC up and running, the options really are limitless when it comes to editing the rules of the image, we can add roles, features and many other custom tasks to the task sequence.
I took a snapshot of my Windows 10 VM as a preparation for the next lab as we’re going to try the refreshment and replacement of the OS.
We will also continue to see how the OSD process are made from the SCCM perspective.
Thanks for reading, see you in another blog.
